Create Basic Grid
In this cookbook, we will create a new grid to display salesmen data in the administration. We will learn how to use the grid factory properly, configure the data displayed, and override the default data presentation. In the end, we will be able to even sort our grid by column, paginate large result sets and delete records.
Prerequisites
- As we are going to list the salesmen, you need to create the Salesman entity and add some entries to the database table following the cookbook, first.
- You should know how to work with controllers, its actions and be familiar with concepts of administration pages in Shopsys Platform.
- We recommend you to read Adding a New Administration Page cookbook.
1. Define the grid
1.1 Create grid factory
First, we need to create a factory responsible for the creation of our new grid.
In App\Grid\Salesman namespace we create the new class that will implement GridFactoryInterface.
This interface forces us to implement SalesmanGridFactory::create method responsible for creating the grid itself.
General class GridFactory helps us prepare the grid so that we can request this service in the constructor.
declare(strict_types=1);

namespace App\Grid\Salesman;

use Shopsys\FrameworkBundle\Component\Grid\Grid;
use Shopsys\FrameworkBundle\Component\Grid\GridFactory;
use Shopsys\FrameworkBundle\Component\Grid\GridFactoryInterface;

class SalesmanGridFactory implements GridFactoryInterface
{
    /**
     * @var \Shopsys\FrameworkBundle\Component\Grid\GridFactory
     */
    protected $gridFactory;

    /**
     * @param \Shopsys\FrameworkBundle\Component\Grid\GridFactory $gridFactory
     */
    public function __construct(GridFactory $gridFactory)
    {
        $this->gridFactory = $gridFactory;
    }

    /**
     * @return \Shopsys\FrameworkBundle\Component\Grid\Grid
     */
    public function create(): Grid
    {
        /* @TODO: implement */
    }
}
In services.yaml, we need to register this new class.
App\Grid\Salesman\SalesmanGridFactory: ~
1.2 Configure grid data source
GridFactory::create() requires an implementation of DataSourceInterface as its second argument.
So we create one that returns all the salesmen we need.
In our SalesmanGridFactory, we add a new protected method, that creates and returns data source.
And because we want to get data from the database, we use a data source created from Doctrine Query Builder.
+ use Doctrine\ORM\EntityManagerInterface;

+   /**
+    * @var \Doctrine\ORM\EntityManagerInterface
+    */
+   protected $entityManager;

-   public function __construct(GridFactory $gridFactory)
+   public function __construct(GridFactory $gridFactory, EntityManagerInterface $entityManager)
    {
        $this->gridFactory = $gridFactory;
+       $this->entityManager = $entityManager;
    }

    /**
     * @return \Shopsys\FrameworkBundle\Component\Grid\Grid
     */
    public function create(): Grid
    {
-       /* @TODO: implement */
+       $grid = $this->gridFactory->create('salesmanGrid', $this->createAndGetDataSource());

+       return $grid;
    }
Now, let's implement createAndGetDataSource method that should be in the same SalesmanGridFactory and will look like this.
use App\Model\Salesman\Salesman;
use Shopsys\FrameworkBundle\Component\Grid\DataSourceInterface;
use Shopsys\FrameworkBundle\Component\Grid\QueryBuilderDataSource;

// ...

    /**
     * @return \Shopsys\FrameworkBundle\Component\Grid\DataSourceInterface
     */
    protected function createAndGetDataSource(): DataSourceInterface
    {
        $queryBuilder = $this->entityManager->createQueryBuilder();

        $queryBuilder->select('s')
            ->from(Salesman::class, 's');

        return new QueryBuilderDataSource($queryBuilder, 's.id');
    }
Do not forget to add import of App\Model\Salesman\Salesman to SalesmanGridFactory.
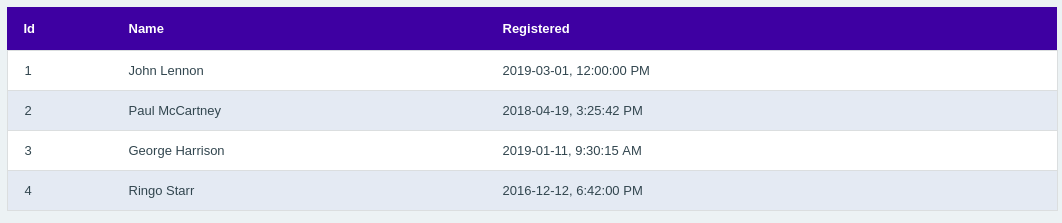
1.3 Add columns to the grid
We prepared our grid, but for now, it is not rendered anywhere and does not contain any columns. We are going to change this now.
First, we add columns we want to see into SalesmanGridFactory::create method.
    public function create(): Grid
    {
        $grid = $this->gridFactory->create('salesmanGrid', $this->createAndGetDataSource());

+       $grid->addColumn('id', 's.id', t('Id'));
+       $grid->addColumn('name', 's.name', t('Name'));
+       $grid->addColumn('registeredAt', 's.registeredAt', t('Registered'));

        return $grid;
    }
Note
In the example above, the column names are translated. Do not forget to dump translations.
2. Display the grid
Grid is ready to show all the salesmen from the database. And we just need to render the grid itself using a controller.
2.1 Create a new controller & action
We must inject (pass through the constructor) SalesmanGridFactory created earlier and pass the grid view to the template.
namespace App\Controller\Admin;

use App\Grid\Salesman\SalesmanGridFactory;
use Shopsys\FrameworkBundle\Controller\Admin\AdminBaseController;
use Symfony\Component\Routing\Annotation\Route;

class SalesmanController extends AdminBaseController
{
    /**
     * @var \App\Grid\Salesman\SalesmanGridFactory
     */
    protected $salesmanGridFactory;

    /**
     * @param \App\Grid\Salesman\SalesmanGridFactory $salesmanGridFactory
     */
    public function __construct(SalesmanGridFactory $salesmanGridFactory)
    {
        $this->salesmanGridFactory = $salesmanGridFactory;
    }

    /**
     * @Route("/salesman/list/")
     */
    public function listAction()
    {
        $grid = $this->salesmanGridFactory->create();

        return $this->render('Admin/Content/Salesman/list.html.twig', [
            'gridView' => $grid->createView(),
        ]);
    }
}
2.2 Create a new template
Finally, it is time to create a new twig template, templates/Admin/Content/Salesman/list.html.twig with the following content:
{% extends '@ShopsysFramework/Admin/Layout/layoutWithPanel.html.twig' %}

{% block title %}- {{ 'Salesmen'|trans }}{% endblock %}
{% block h1 %}{{ 'Salesmen'|trans }}{% endblock %}

{% block main_content %}
    {{ gridView.render() }}
{% endblock %}
Now, you should be able to see the basic grid with salesmen data when accessing /admin/salesman/list/
Note
If you want to add a link to the page to the menu and proper breadcrumb navigation, please check the corresponding section in Adding a New Administration Page cookbook.
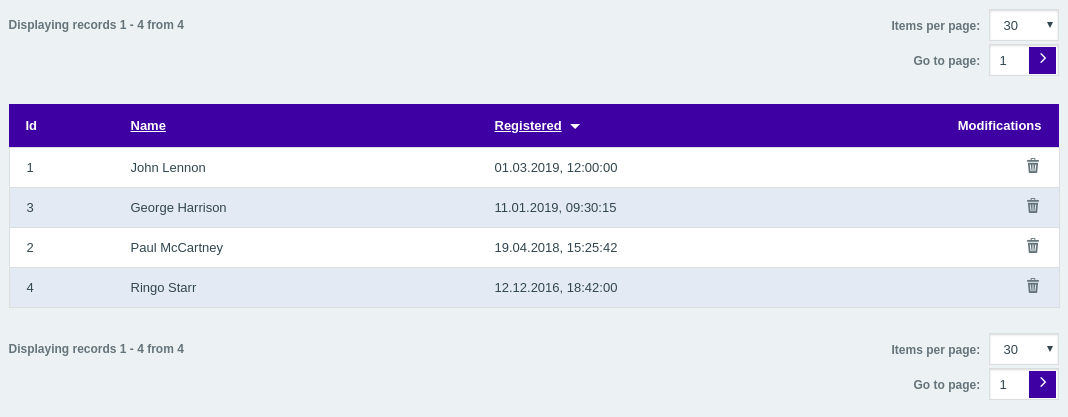
3. Modify the basic grid appearance
As you probably noticed, dates in the third column are not printed much friendly. To adjust appearance (e.g., let's say we are in Germany and want to format the dates appropriately), we just need to extend the default grid template and modify it accordingly.
3.1 Create a new template
We create the new twig template listGrid.html.twig in templates/Admin/Content/Salesman.
The template has to extend @ShopsysFramework/Admin/Grid/Grid.html.twig and override block grid_value_cell_id_registeredAt where we apply a Twig filter to the value.
You can read more about blocks here.
{% extends '@ShopsysFramework/Admin/Grid/Grid.html.twig' %}

{% block grid_value_cell_id_registeredAt %}
    {{ value|formatDateTime('de') }}
{% endblock %}
3.2 Set the grid theme
Now that we have template ready, we just need to set it as the theme in the grid factory.
// src/Grid/Salesman/SalesmanGridFactory

    public function create(): Grid
    {
        $grid = $this->gridFactory->create('salesmanGrid', $this->createAndGetDataSource());

        ...

+       $grid->setTheme('Admin/Content/Salesman/listGrid.html.twig');

        return $grid;
    }
4. Sort rows
Now, we see data as we want, but it would be nice to be able to adjust the view from the user's perspective. We may want to ease the finding of a certain salesman by allowing to sort rows by name or date of creation.
A default order will be by date with the newest salesmen at the top.
// src/Grid/Salesman/SalesmanGridFactory

    public function create(): Grid
    {
        $grid = $this->gridFactory->create('salesmanGrid', $this->createAndGetDataSource());

        $grid->addColumn('id', 's.id', t('Id'));
-       $grid->addColumn('name', 's.name', t('Title'));
+       $grid->addColumn('name', 's.name', t('Title'), true);
-       $grid->addColumn('registeredAt', 's.registeredAt', t('Registered'));
+       $grid->addColumn('registeredAt', 's.registeredAt', t('Registered'), true);

+       $grid->setDefaultOrder('registeredAt', DataSourceInterface::ORDER_DESC);

        ...
   }
5. Paginate results
As the number of salesmen grows, the clarity decreases rapidly. To keep work with grid enjoyable, we can split data across several pages with pagination.
In the grid, we just need to call one method.
// src/Grid/Salesman/SalesmanGridFactory

    public function create(): Grid
    {
        $grid = $this->gridFactory->create('salesmanGrid', $this->createAndGetDataSource());
        ...

+       $grid->enablePaging();

        ...
     }
6. Delete salesmen using the grid
As the last, an admin may want to delete some salesmen. Grid eases the task with an already implemented action column.
6.1 Implement the deletion logic
First, we need to get the salesman entity by its ID and remove it from persistence using the Doctrine entity manager.
We will follow the basic concepts of Shopsys Platform (see "Basics about model architecture" article) and create new classes - SalesmanFacade and SalesmanRepository.
6.1.1 Create SalesmanRepository and implement getById method
// src\Model\Salesman\SalesmanRepository.php
declare(strict_types=1);

namespace App\Model\Salesman;

use Doctrine\ORM\EntityManagerInterface;
use Doctrine\ORM\EntityRepository;

class SalesmanRepository
{
    /**
     * @var \Doctrine\ORM\EntityManagerInterface
     */
    protected $em;

    /**
     * @param \Doctrine\ORM\EntityManagerInterface $em
     */
    public function __construct(EntityManagerInterface $em)
    {
        $this->em = $em;
    }

    /**
     * @param int $salesmanId
     * @return \App\Model\Salesman\Salesman
     */
    public function getById(int $salesmanId): Salesman
    {
        $salesman = $this->getSalesmanRepository()->find($salesmanId);

        if ($salesman === null) {
            // you should throw new custom exception here...
        }

        return $salesman;
    }

    /**
     * @return \Doctrine\ORM\EntityRepository
     */
    protected function getSalesmanRepository(): EntityRepository
    {
        return $this->em->getRepository(Salesman::class);
    }
}
6.1.2 Create SalesmanFacade and implement deleteById method
// src\Model\Salesman\SalesmanFacade.php
declare(strict_types=1);

namespace App\Model\Salesman;

use Doctrine\ORM\EntityManagerInterface;

class SalesmanFacade
{
    /**
     * @var \Doctrine\ORM\EntityManagerInterface
     */
    protected $entityManager;

    /**
     * @var \App\Model\Salesman\SalesmanRepository
     */
    protected $salesmanRepository;

    /**
     * @param \Doctrine\ORM\EntityManagerInterface $entityManager
     * @param \App\Model\Salesman\SalesmanRepository $salesmanRepository
     */
    public function __construct(EntityManagerInterface $entityManager, SalesmanRepository $salesmanRepository)
    {
        $this->entityManager = $entityManager;
        $this->salesmanRepository = $salesmanRepository;
    }

    /**
     * @param int $salesmanId
     */
    public function deleteById(int $salesmanId)
    {
        $salesman = $this->salesmanRepository->getById($salesmanId);

        $this->entityManager->remove($salesman);
        $this->entityManager->flush();
    }
}
6.2 Add delete action to the controller
In our SalesmanController, we add the new action to delete the salesman using SalesmanFacade.
// src/Controller/Admin/SalesmanController
namespace App\Controller\Admin;

use App\Grid\Salesman\SalesmanGridFactory;
+ use App\Model\Salesman\SalesmanFacade;
+ use Shopsys\FrameworkBundle\Component\Router\Security\Annotation\CsrfProtection;
use Shopsys\FrameworkBundle\Controller\Admin\AdminBaseController;
use Symfony\Component\Routing\Annotation\Route;

class SalesmanController extends AdminBaseController
{
+    /**
+     * @var \App\Model\Salesman\SalesmanFacade
+     */
+    protected $salesmanFacade;

-    public function __construct(SalesmanGridFactory $salesmanGridFactory)
+    public function __construct(SalesmanGridFactory $salesmanGridFactory, SalesmanFacade $salesmanFacade)
     {
         $this->salesmanGridFactory = $salesmanGridFactory;
+        $this->salesmanFacade = $salesmanFacade;
+    }

+    /**
+     * @Route("/salesman/delete/{id}", requirements={"id" = "\d+"})
+     * @CsrfProtection
+     */
+    public function deleteAction($id)
+    {
+        $this->salesmanFacade->deleteById($id);
+
+        $this->getFlashMessageSender()
+            ->addInfoFlash(t('Salesman with id %id% deleted', ['%id%' => $id]));
+
+        return $this->redirectToRoute('admin_salesman_list');
+    }
Tip
It is a good practice to enable CSRF protection on this type of action.
6.3 Add action column to the grid
We just use addDeleteActionColumn in the existing SalesmanGridFactory with arguments admin_salesman_delete as a route and request parameters (the action needs to know the salesman's ID to delete).
To prevent accidental deletion, we can also set a confirmation message.
// src/Grid/Salesman/SalesmanGridFactory

    public function create(): Grid
    {
        $grid = $this->gridFactory->create('salesmanGrid', $this->createAndGetDataSource());

        $grid->addColumn('id', 's.id', t('Id'));
        $grid->addColumn('name', 's.name', t('Title'));
        $grid->addColumn('registeredAt', 's.registeredAt', t('Registered'));

+       $grid->addDeleteActionColumn('admin_salesman_delete', ['id' => 's.id'])
+           ->setConfirmMessage(t('Do you really want to remove this salesman?'));
    ...
Conclusion
Now, you should be able to create a new grid and use the strengths of the grid component to display, sort and delete salesmen. A similar approach could be used to create a grid that precisely presents any data in a way you need.