Adding a New Administration Page
In this cookbook, we will add a new page to the administration, namely a new dashboard page with Twitter updates. We will see how to create a new admin controller, what template to extend, and how to extend the menu along with the breadcrumb navigation.
New admin controller
The first step to creating a new page is creating a controller (for details, see Symfony Controller documentation).
Create a class extending AdminBaseController in src/Controller/Admin directory with a single method (action):
namespace App\Controller\Admin;

use Shopsys\FrameworkBundle\Controller\Admin\AdminBaseController;
use Symfony\Component\Routing\Annotation\Route;

class DashboardController extends AdminBaseController
{
    /**
     * @Route("/dashboard/twitter/")
     */
    public function twitterAction()
    {
        return $this->render('Admin/Content/Dashboard/twitter.html.twig');
    }
}
The Admin directory is already configured to use routing by annotations, as it is the easiest to use.
By adding the @Route("/dashboard/twitter/") annotation, you are creating a route named admin_dashboard_twitter (admin_ + lowercase controller name + _ + lowercase action name).
This newly added route should be available under the URL http://127.0.0.1:8000/admin/dashboard/twitter/ by default. If you try to access the page, it will fail on loading a non-existing template, which we will fix in the next step.
If you'd like to create something more complicated, you can require other services in the controller's constructor, which will be autowired.
Twig template
Create a new Twig template named twitter.html.twig in templates/Admin/Content (you'll have to create the directory).
The template should extend @ShopsysFramework/Admin/Layout/layoutWithPanel.html.twig and extend its blocks title, h1 and block main_content:
{% extends '@ShopsysFramework/Admin/Layout/layoutWithPanel.html.twig' %}

{% block title %}- {{ 'Tweets by @ShopsysFW'|trans }}{% endblock %}
{% block h1 %}{{ 'Updates from Shopsys Platform'|trans }}{% endblock %}

{% block main_content %}
    <a class="twitter-timeline" data-lang="{{ app.request.locale }}" data-theme="light" href="https://twitter.com/ShopsysFW"></a>
    <script async src="https://platform.twitter.com/widgets.js" charset="utf-8"></script>
{% endblock %}
The page's content is just a simple Twitter widget, but you can put any content on your page. You can use the controller to pass some parameters to your template. Feel free to examine other controllers for inspiration.
If you're new to Twig, you can take a look at Symfony Templating documentation.
Now, the page should load correctly and display the newest tweets of @ShopsysFW. But to access it, you still need to open a specific URL...
Side menu and breadcrumbs
The admin side menu is implemented by KnpMenuBundle and to extend it, you can use events. For details about the menu customization, read the Administration Menu article.
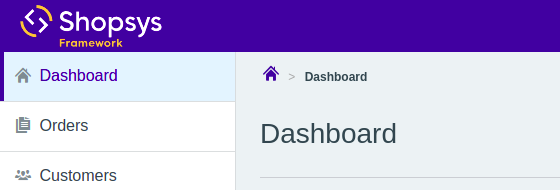
Right now, the Dashboard menu looks like this:
Create a new event subscriber and subscribe to the ConfigureMenuEvent::SIDE_MENU_DASHBOARD event.
This is an event that will allow you to reconfigure the Dashboard menu and add a new item there.
You can take a look at the class ConfigureMenuEvent to see other events you can subscribe to.
You can put the subscriber right beside your new controller.
In the subscriber, you should add a new child to the menu with the route of your new page. As the Dashboard menu currently has no children, you can remove the link and add a new child with the original dashboard, so it's still accessible:
namespace App\Controller\Admin;

use Knp\Menu\ItemInterface;
use Shopsys\FrameworkBundle\Model\AdminNavigation\ConfigureMenuEvent;
use Symfony\Component\EventDispatcher\EventSubscriberInterface;

class SideMenuConfigurationSubscriber implements EventSubscriberInterface
{
    public static function getSubscribedEvents(): array
    {
        return [ConfigureMenuEvent::SIDE_MENU_DASHBOARD => 'configureDashboardMenu'];
    }

    public function configureDashboardMenu(ConfigureMenuEvent $event): void
    {
        $dashboardMenu = $event->getMenu();

        $dashboardMenu->addChild('default', ['route' => 'admin_default_dashboard', 'label' => t('Default dashboard')]);
        $dashboardMenu->addChild('twitter', ['route' => 'admin_dashboard_twitter', 'label' => t('Tweets by @ShopsysFW')]);

        $this->removeLink($dashboardMenu);
    }

    private function removeLink(ItemInterface $item): void
    {
        $item->setExtra('routes', []);
        $item->setUri(null);
    }
}
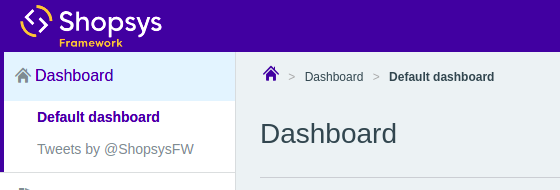
The event subscriber should be auto-discovered by Symfony, reconfiguring the menu and resulting in this structure:
Conclusion
We've seen how to add a new simple page into the administration with a route and its own place in the side menu. A similar approach could be used to add more complicated parametrized pages using other services or forms.
Also, we've not only added a new item to the menu, but we've modified some parameters of an already existing menu item, removing the link from it. This can be used to alter the menu in a more significant way.
To see how the side menu works, you can see the SideMenuBuilder class where it is created.